> ## Documentation Index
> Fetch the complete documentation index at: https://dynamic-docs-feat-sidebar-revamp.mintlify.site/llms.txt
> Use this file to discover all available pages before exploring further.
# ZeroDev
The first iteration of account abstraction from Dynamic uses [ZeroDev](https://zerodev.app/) and embedded wallets.
This guide will walk you through setting up ZeroDev and Dynamic so that you can sponsor transactions. While we're using Base Sepolia for this guide, you can use any network that has implemented the Ethereum Petra upgrade.
### Initial setup
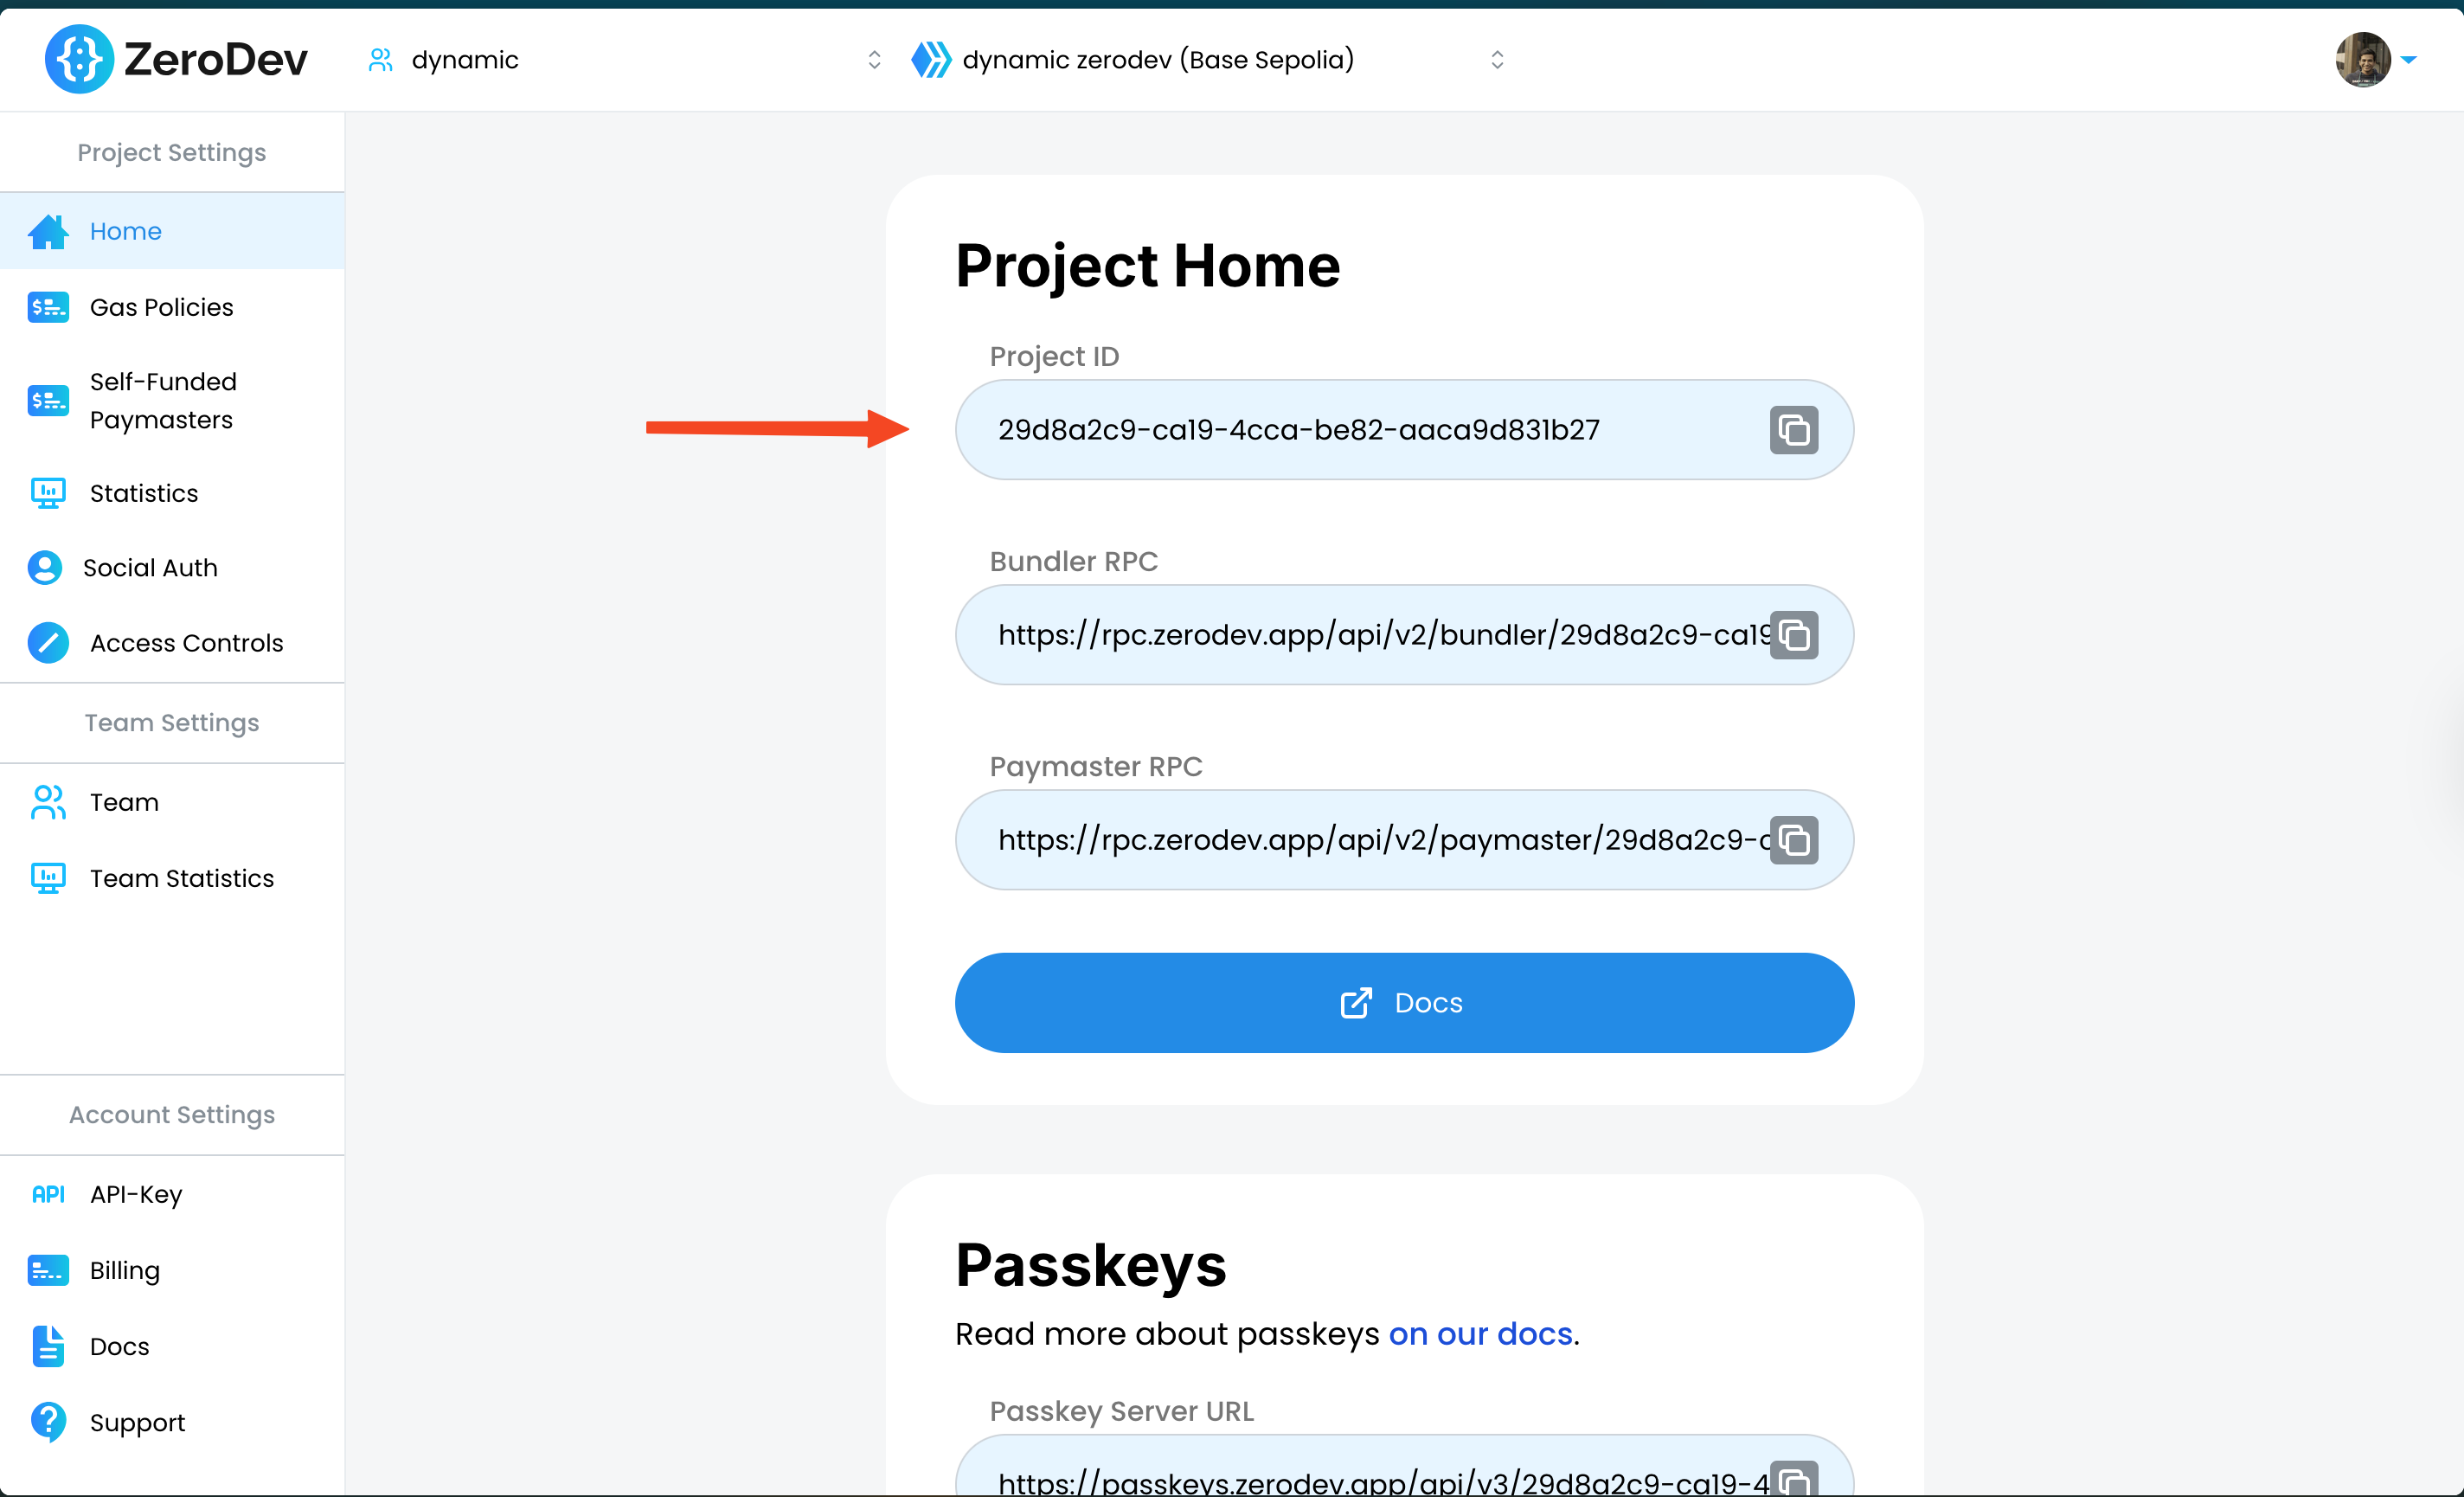
Sign up for a free account at [https://dashboard.zerodev.app/](https://dashboard.zerodev.app/) and create a project, configure your project name and network (we'll use Base Sepolia for this example, but you can choose any supported network) and copy your new ZeroDev project ID.
Note that the network you select in your ZeroDev project will be the network
that the smart contract wallet is deployed on and cannot be changed without
creating a new project. Choose a network that aligns with your application's needs.
In [the EVM section of your Dynamic Dashboard](https://app.dynamic.xyz/dashboard/chains-and-networks#evm), toggle on the network you selected in the previous step (we're using Base Sepolia in this guide) and click Save.
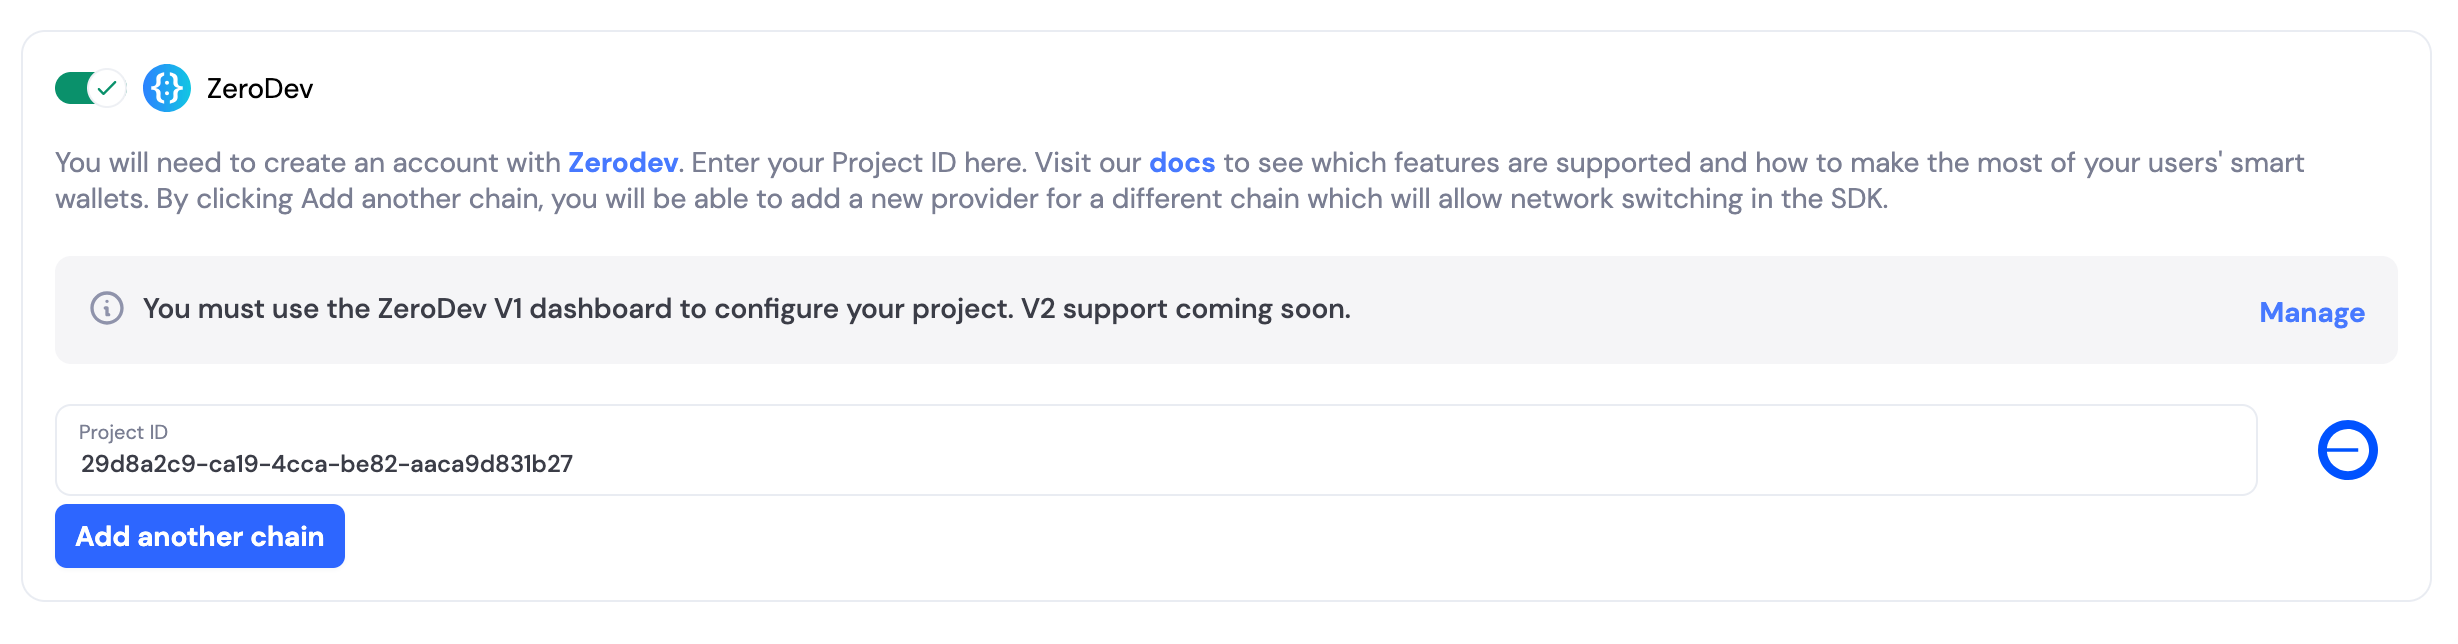
Now, go to [the Account Abstraction section](https://app.dynamic.xyz/dashboard/configurations#accountabstraction), enable ZeroDev and paste in your ZeroDev project id.
You must be using at least SDK version 3.3.0 or 4.0.0-alpha.8 to have access to this feature
Click on "Add another chain". You can input 1 ZeroDev project ID per chain you would like enabled.
If you would like to remove a multichain ZeroDev provider, hover your mouse over the network icon and you should be able to click the "Trash icon" to remove.
Click "Yes" to save and add another provider if desired.
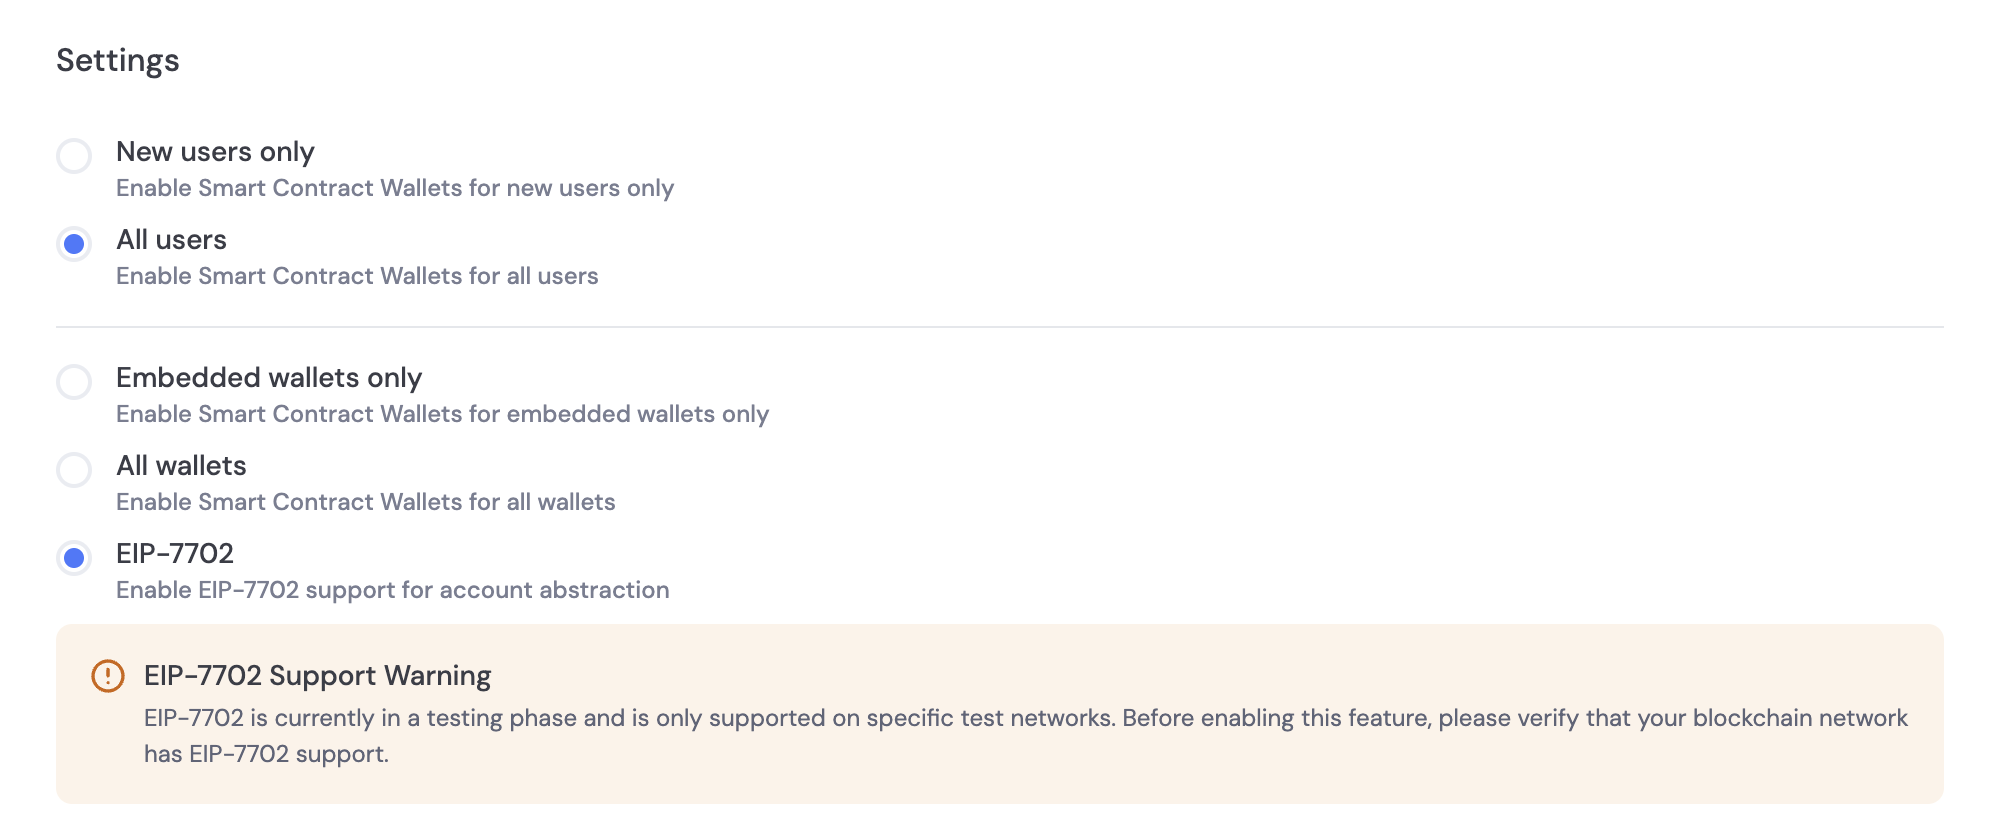
On the same configuration page as the step above, you'll see there are two different types of configuration for issuing Smart Contract Wallets (SCWs) in Dynamic - the wallet level and the user level.
* Wallet level
Choose whether to issue SCWs to all wallets, or only to embedded wallets. Note that for the former, you will need to handle the UI and frontend yourself.
* User level
Choose whether to issue SCWs to all your users (existing included next time they log in), or just new users.
On the same configuration page as the 2 steps above, you'll see there is a setting for how the Dynamic SDK treats the signer and the smart wallet - only the smart wallet or both the smart wallet and signer.
* Show Smart Wallet Only
Only allows you to interact with the smart wallet directly.
* Show Smart Wallet & Signer
Treats the smart wallet and signer as separate wallets which you can switch between.
Back in your Dynamic Dashboard, go to [the Embedded Wallets section](https://app.dynamic.xyz/dashboard/embedded-wallets/dynamic) and enable Dynamic-powered embedded wallets.
Lastly, in [the Log in & User Profile section](https://app.dynamic.xyz/dashboard/log-in-user-profile), enable Email sign up (optionally, enable social sign up and configure oauth)
Note that we currently only create smart wallets for embedded wallets. You
will see native web3 wallets in your Dynamic widget, and can still use one to
sign in, but only new embedded wallets will have a smart wallet.
For this guide, we'll be using React and TypeScript, but this can easily be adapted to other frameworks.
If you don't already have an app created, check out our [Quickstart](/quickstart) guide or [Create dynamic app](/example-apps).
In your existing project, make sure to install the account abstraction package:
```bash Shell
npm install @dynamic-labs/ethereum-aa
```
```bash Shell
yarn add @dynamic-labs/ethereum-aa
```
```bash Shell
pnpm add @dynamic-labs/ethereum-aa
```
```bash Shell
bun add @dynamic-labs/ethereum-aa
```
Then add the `ZeroDevSmartWalletConnectors` to your existing `walletConnectors` array in the `DynamicContextProvider`:
To use ZeroDev v5.2, use Dynamic SDK version `^2.0.5`. For newer versions, use the latest compatible Dynamic SDK.
```tsx
import { DynamicContextProvider, DynamicWidget } from "@dynamic-labs/sdk-react-core";
import { EthereumWalletConnectors } from "@dynamic-labs/ethereum";
import { ZeroDevSmartWalletConnectors } from "@dynamic-labs/ethereum-aa";
const App = () => (
)
export default App;
```
Make sure to grab your Dynamic environment id from the Dynamic Dashboard
under Developer > SDK & API Keys, and replace it in the `environmentID`
setting.
Now we will set up a basic gas sponsorship policy in the ZeroDev
dashboard
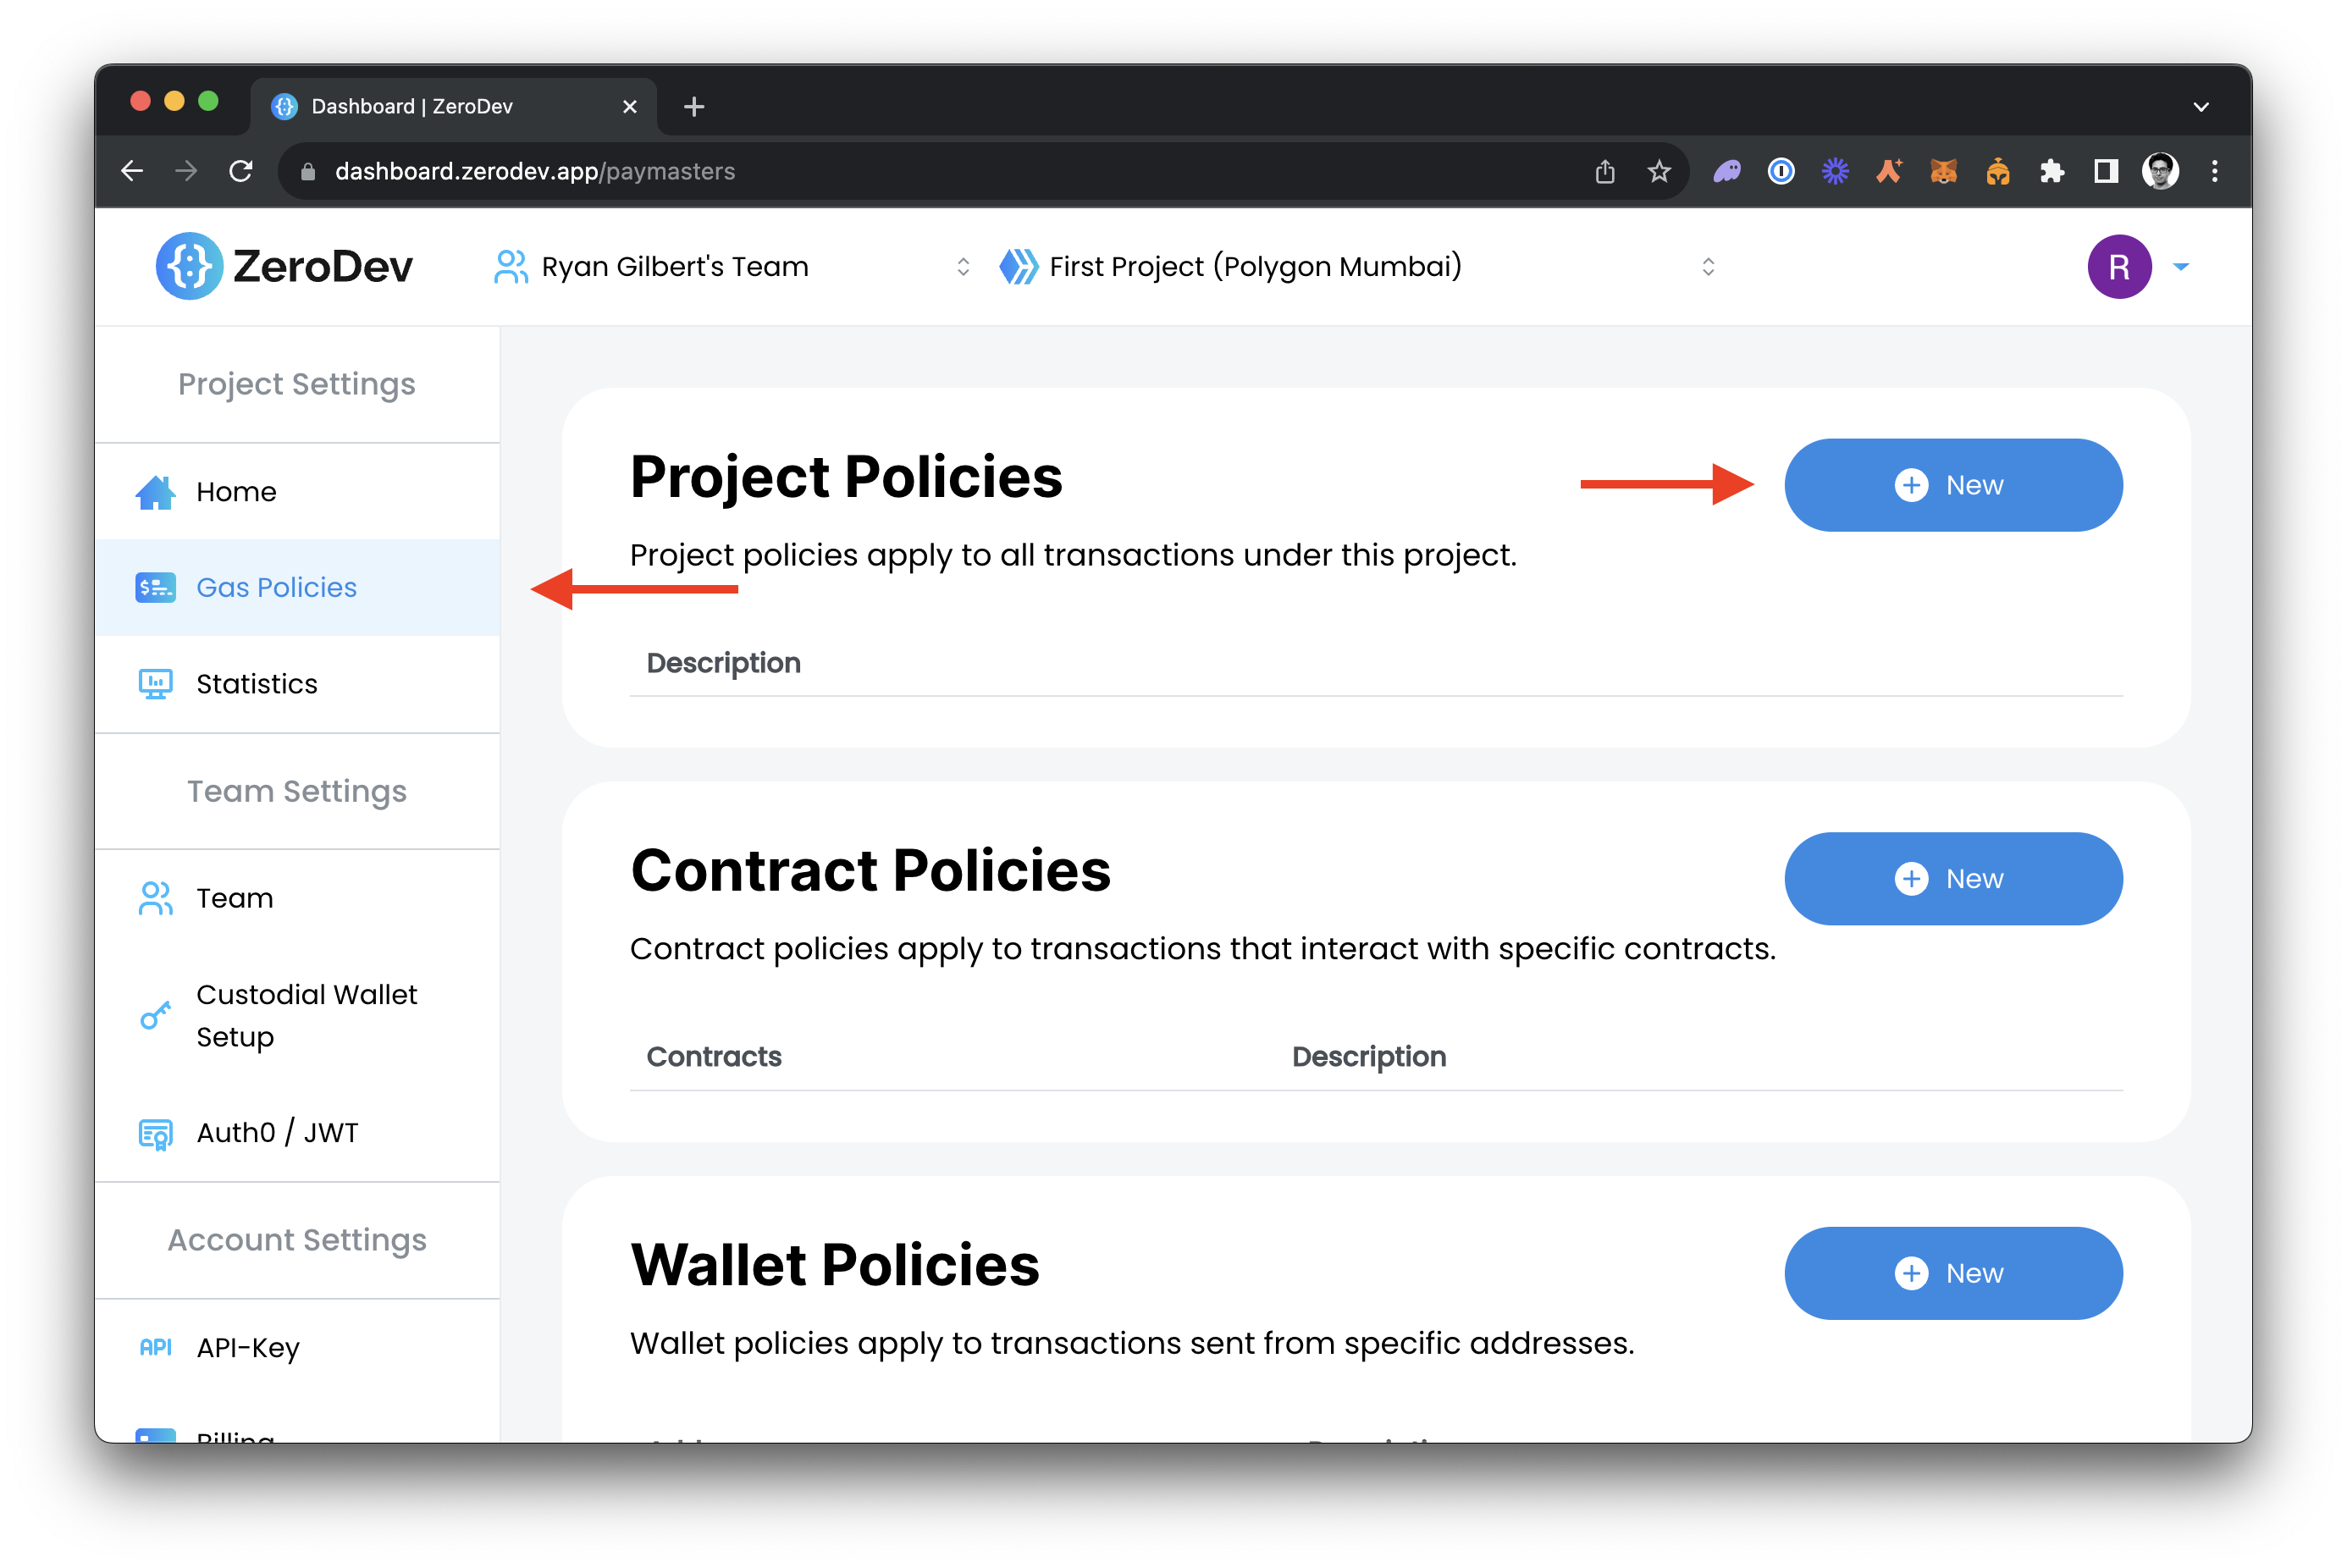
In the Gas Policies tab, click on the button labeled "New" in the Project Policies section
Select "Amount" as the Type, "0.1" as the value and "Day" as the interval. This is saying that we will sponsor up to 0.1 ETH total per day
Click Create Project Policy, and that's it! Now start your app, log in and try sending some ETH out. The Dynamic SDK will check if a transaction meets your gas policies and will automatically hide the gas in the transaction confirmation step if the gas is sponsored, if not the gas will be displayed.
Since you will be creating a brand new wallet when you log in, you will need to fund it with the native token of your chosen network. If you're using Base Sepolia as in this guide, you can access a free ETH faucet here: [https://www.alchemy.com/faucets/base-sepolia](https://www.alchemy.com/faucets/base-sepolia)
To interact with the wallet, you will need to interact with the kernel client. This allows you to send user operations and transactions through your smart wallet.
```typescript
const connector = primaryWallet?.connector;
const kernelClient = connector.getAccountAbstractionProvider({
withSponsorship: true,
});
const userOpHash = await kernelClient.sendUserOperation({
callData: await kernelClient.account.encodeCalls([
{
data: "0x",
to: zeroAddress,
value: BigInt(0),
},
{
data: "0x",
to: zeroAddress,
value: BigInt(0),
},
]),
});
```
Note that there is a delay between loading the page and the ZeroDev kernel client
being available. To ensure that the kernel client is available,
please await one of the following methods: `getAddress()`, `getConnectedAccounts()` or `getNetwork()`
before calling `getAccountAbstractionProvider()`.
### Complete EIP-7702 Example
The only bundler that supports EIP-7702 is Pimlico. So you will need to use the `ZeroDevSmartWalletConnectorsWithConfig` connector and pass in the `bundlerProvider` prop with the value `PIMLICO`.
```typescript
ZeroDevSmartWalletConnectorsWithConfig({ bundlerProvider: 'PIMLICO' })
```
If you're planning to use EIP-7702 (which allows EOAs to upgrade to smart accounts), the same kernel interaction principles apply. To learn more about EIP-7702, see our [EIP-7702 guide](/smart-wallets/smart-wallet-providers/7702).
```typescript
import { EthereumWalletConnectors, } from '@dynamic-labs/ethereum';
import { DynamicContextProvider, DynamicWidget, useDynamicContext} from '@dynamic-labs/sdk-react-core';
import { ZeroDevSmartWalletConnectors, isZeroDevConnector } from '@dynamic-labs/ethereum-aa';
import { zeroAddress } from 'viem';
import { useState } from 'react';
// Note: You'll need to import or create Button and Typography components
// import { Button, Typography } from 'your-ui-library';
function App() {
return (
)
}
function Sign7702Transaction() {
const { primaryWallet } = useDynamicContext();
const [error, setError] = useState("");
const [txHash, setTxHash] = useState("");
const [isSendingTransaction, setIsSendingTransaction] = useState(false);
if (!primaryWallet) {
return null;
}
const handleSendTransaction = async () => {
const connector = primaryWallet?.connector;
if (!connector) {
setError("No connector found");
return;
}
if (!isZeroDevConnector(connector)) {
setError("Connector is not a ZeroDev connector");
return;
}
const params = {
withSponsorship: true,
};
const kernelClient = connector.getAccountAbstractionProvider(params);
if (!kernelClient) {
setError("No kernel client found");
return;
}
try {
setIsSendingTransaction(true);
const userOpHash = await kernelClient.sendUserOperation({
callData: await kernelClient.account.encodeCalls([
{
data: "0x",
to: zeroAddress,
value: BigInt(0),
},
{
data: "0x",
to: zeroAddress,
value: BigInt(0),
},
]),
});
const { receipt } = await kernelClient.waitForUserOperationReceipt({
hash: userOpHash,
});
setTxHash(receipt.transactionHash);
setError("");
} catch (err: unknown) {
setError(
err instanceof Error ? err.message : "Error sending transaction"
);
} finally {
setIsSendingTransaction(false);
}
};
return (
<>
);
};
export default App
```
When using EIP-7702, make sure to:
* Enable a 7702 compatible network (like Odyssey Testnet) on [Dynamic's Chains](https://app.dynamic.xyz/dashboard/chains-and-networks#evm)
* Select 7702 for wallet options during ZeroDev configuration in the dashboard
Run your app, and if you copied our snippet from earlier, you should see this
basic page
Click Connect your wallet, enter your email and hit Continue. After pasting in your OTP you'll be fully logged in!
Next, we're going to send a transaction. To do that, we will need some of the network's native token. Grab your wallet address by clicking on the Dynamic Widget, then click on the three dots next to your address and hit "Copy wallet address". If you're using Base Sepolia as in this guide, you can paste your address into the [Base Sepolia Faucet](https://www.alchemy.com/faucets/base-sepolia) which will deposit some free ETH into your account. After doing so, if you refresh your app, you should see your balance update
Optionally, set up fiat onramp by following our guide here:
[https://docs.dynamic.xyz/fiat-onboarding/banxa](https://docs.dynamic.xyz/fiat-onboarding/banxa)
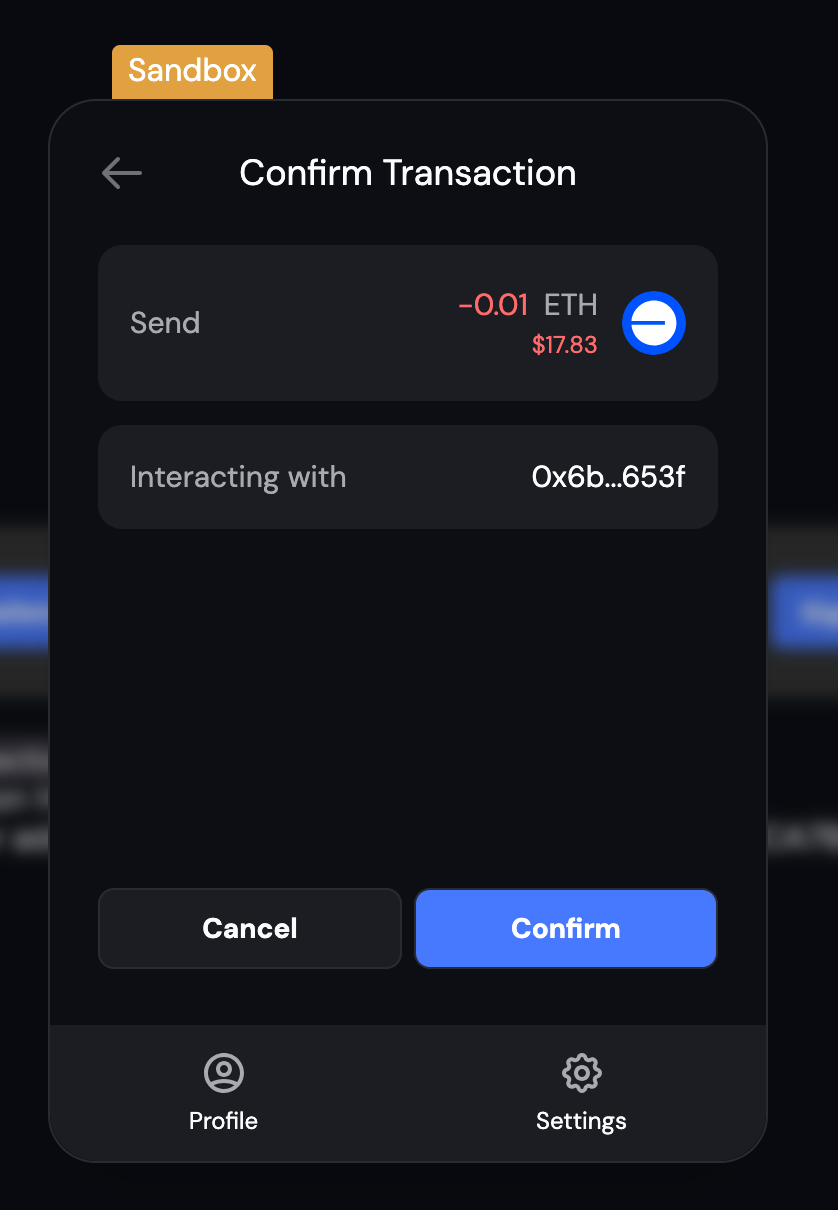
Now, send yourself some tokens by clicking on the Send button in the Dynamic Widget. Enter 0.01 as the amount, and an address of your choosing as the recipient, then hit Send now. You will see a screen like the following. Notice that there is no gas estimate field, because this transaction will be sponsored!
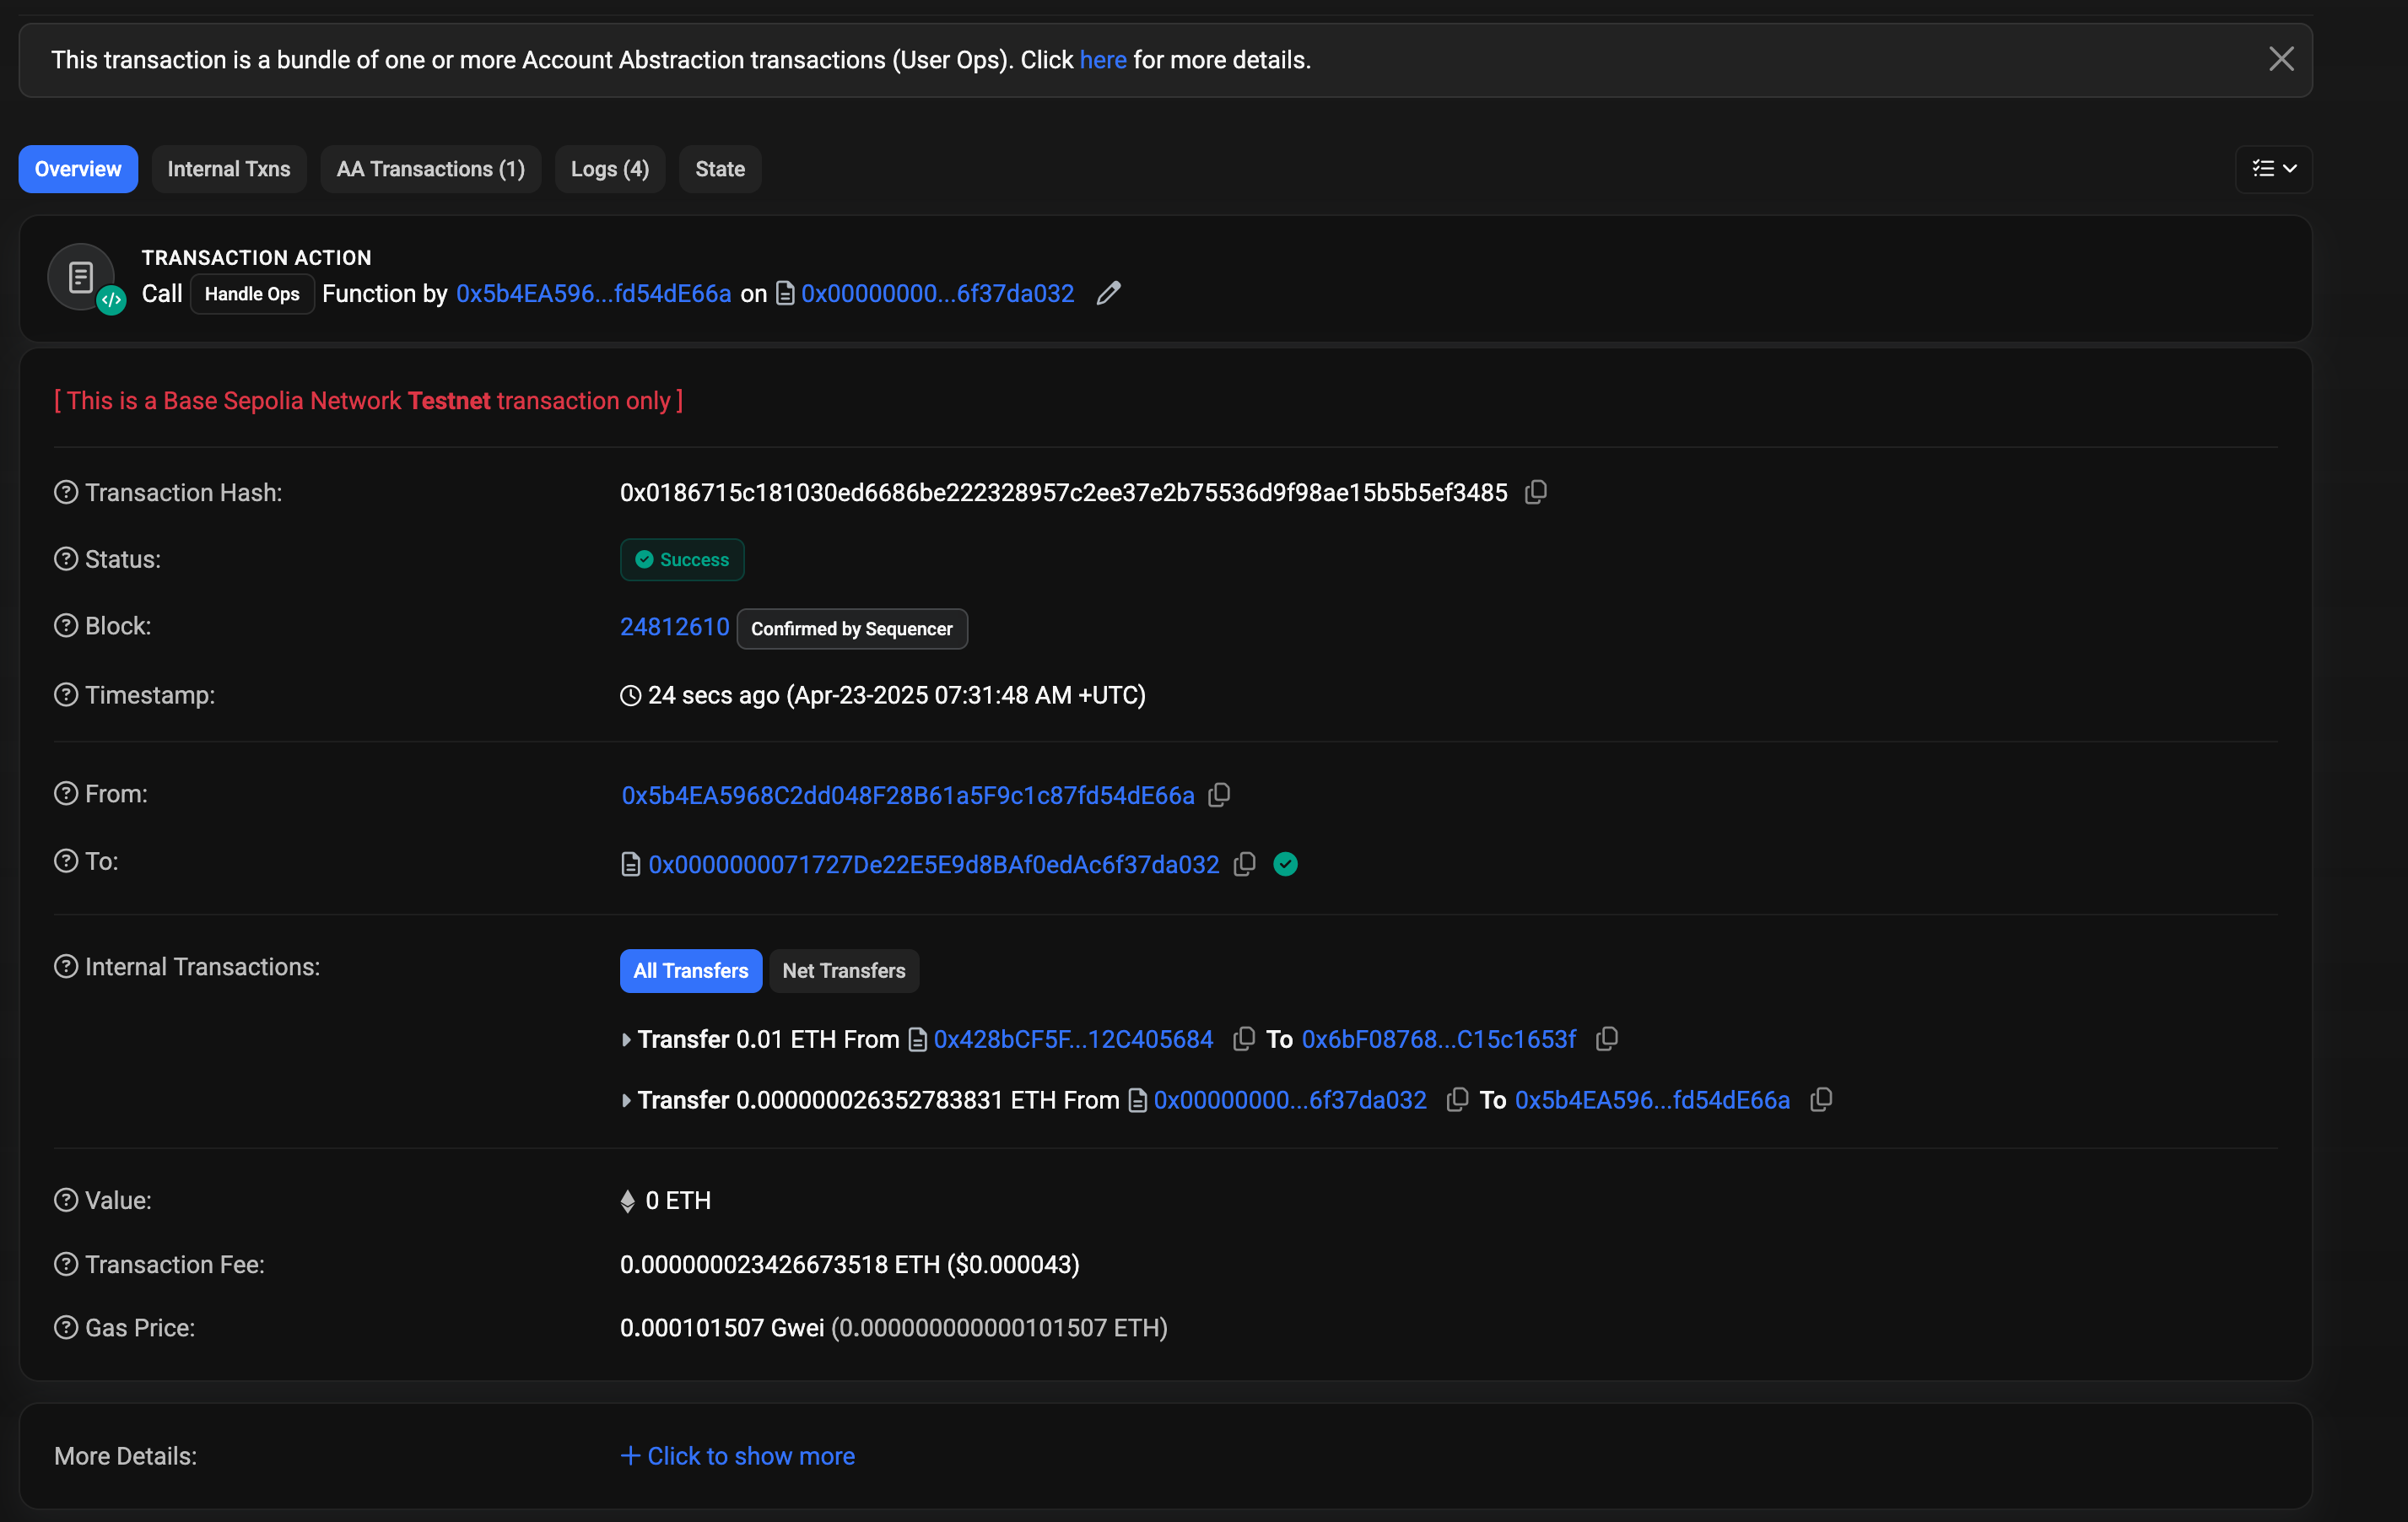
Hit confirm, sign for the transaction with your passkey. Congratulations, you just sent a gas-sponsored transaction! If you take your smart wallet address and paste it into the block explorer for your network (for Base Sepolia, that's the [Base Sepolia Scan](https://sepolia.basescan.org/)), you will see your smart wallet and the transaction you just sent.
## Advanced Configuration
Now that you've completed the initial setup and sent your first transaction, you can utilize the full functionality of ZeroDev inside Dynamic - everything from session keys to gas policies. Learn more in the [ZeroDev Docs](https://docs.zerodev.app/).
#### Specifying a bundler/paymaster RPC
Use `ZeroDevSmartWalletConnectorsWithConfig` and pass in values for `bundlerRpc` and `paymasterRpc`:
```tsx
import { ZeroDevSmartWalletConnectorsWithConfig } from "@dynamic-labs/ethereum-aa";
{/* ... your app */}
;
```
For more info, see: [Pimlico Paymaster documentation](https://docs.zerodev.app/sdk/infra/pimlico#using-pimlico-paymaster)
#### Specifying a bundler
To specify a bundler, use `ZeroDevSmartWalletConnectorsWithConfig` and pass in a value for `bundlerProvider`:
```tsx
import { ZeroDevSmartWalletConnectorsWithConfig } from "@dynamic-labs/ethereum-aa";
{/* ... your app */}
;
```
For more info, see: [https://docs.zerodev.app/meta-infra/rpcs#bundler--paymaster-rpcs](https://docs.zerodev.app/meta-infra/rpcs#bundler--paymaster-rpcs)
#### Retrieving the Kernel Client using `getAccountAbstractionProvider()`
```tsx
import { isZeroDevConnector } from '@dynamic-labs/ethereum-aa';
const App = () => {
const { primaryWallet } = useDynamicContext();
useEffect(() => {
const { connector } = primaryWallet;
const getKernelClient = async () => {
if (!isZeroDevConnector(connector)) {
return;
}
// ensure that the kernel client has been loaded successfully
await connector.getNetwork();
const params = {
// if you have gas sponsorship enabled, set `withSponsorship` to `true`, else omit
withSponsorship: true
};
const kernelClient = connector.getAccountAbstractionProvider(params);
}
...
}
```
#### Using with Viem & Ethers
You can use viem or ethers with account abstraction to sign messages or send sponsored transaction with no extra configuration, it also works with our [wagmi integration](/react-sdk/providers/dynamicwagmiconnector).
## Going Further
Once you've tested things out and want to deploy to a live network, you will need to do the following:
1. Add your credit card to ZeroDev under Account Settings > Billing
2. Create a new ZeroDev project and select a live network
3. Copy your new ZeroDev project id and paste it into your Dynamic Dashboard
a. We recommend using your Dynamic Sandbox environment for testing your testnet setup, and using your Dynamic Live environment for production.
### Restricting Access to your ZeroDev Project
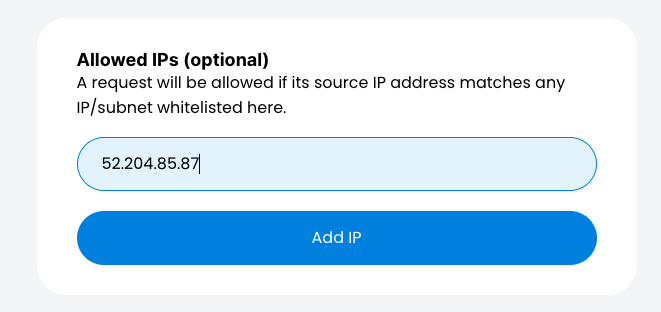
In order to restrict access to your ZeroDev project id to allow only dynamic to use it you can add dynamic's static IP address's to your projects IP allowlist.
Dynamic's IP addresses:
* `52.204.85.87`
* `54.145.74.8`
* `107.20.170.238`
* `52.206.26.56`
* `3.232.2.67`
* `44.213.187.169`
## Examples
### Get smart wallet address vs signer address
The wallet connector will return your smart wallet address, that address will be used in the Dynamic UI and is the main address you will interact with. But you can fetch the signer address by using the wallet connector's eoaConnector property and then fetching the address there.
```tsx
import { useEffect, useState } from "react";
import {
useDynamicContext,
DynamicContextProvider,
DynamicWidget,
} from "@dynamic-labs/sdk-react-core";
import {
isZeroDevConnector,
ZeroDevSmartWalletConnectors,
} from "@dynamic-labs/ethereum-aa";
import { EthereumWalletConnectors } from "@dynamic-labs/ethereum";
const SignerAddress = () => {
const { primaryWallet } = useDynamicContext();
const [signerAddress, setSignerAddress] = useState("");
useEffect(() => {
if (!primaryWallet) {
return;
}
const {
connector,
address, // This is your smart wallet address
} = primaryWallet;
if (!isZeroDevConnector(connector)) {
return;
}
const signerConnector = connector.eoaConnector;
if (!signerConnector) {
return;
}
const getAddress = async () => {
const address = await signerConnector.getAddress();
if (!address) {
return;
}
setSignerAddress(address);
};
getAddress();
}, [primaryWallet]);
return My Signer address: {signerAddress};
};
const App = () => (
);
export default App;
```
For more information about ZeroDev's AA features, go to [ZeroDev's documentation](https://docs.zerodev.app/)
## FAQ
Yes, but not today with Dynamic. We are working on developing new flows to make managing existing EOA wallets with SCWs a smooth transition.
It depends which provider you choose. For example, with ZeroDev you have the following options:
* Arbitrum One
* Avalanche
* Base
* Binance Smart Chain
* Ethereum
* Optimism
* Polygon
Each provider will handle things differently, so it's always better to check
directly with them. For example, with ZeroDev you can't change the network
after deployment. With Alchemy, it might be possible in a roundabout way.
With Dynamic, you will need to use either ZeroDev or Alchemy. If you have
alternative AA providers, please reach out via our
[slack](https://www.dynamic.xyz/slack).
This is [an advanced feature](https://www.dynamic.xyz/pricing), but there is
no additional cost from Dynamic beyond the advanced tier itself. The providers
do take a transaction fee, which you can see on their respective pricing
pages.
We are adding customers one at a time for a few weeks, after which we’ll open
it up to the general public as GA.
Private keys are managed by the EOA, not the SCW. Every SCW has a Signer, or
Owner, which is the EOA.
The only way the SCW can be recovered is if the EOA is recovered. The SCW is a
smart contract, and the EOA is the owner of the SCW. If the EOA is lost, the
SCW is lost.
It's a common misconception that AA wallets are inherently non-custodial. In fact, whether a wallet is AA or not has nothing to do with whether it's custodial. It's the signers that determine whether a wallet is custodial.
That is, if you use a non-custodial signer such as local private keys to manage your AA wallet, then it's non-custodial. At the same time, if you use a custodial key provider such as Fireblocks to manage your AA wallet, then it's custodial.
In any case, whoever has custody over the signers has custody over the wallet.
We have wrapped our providers so you get all the benefit, and more. For
example, we handle the transaction hashing so it’s user friendly and are able
to show the SCW in our widgets and connectors.
 If you would like to remove a multichain ZeroDev provider, hover your mouse over the network icon and you should be able to click the "Trash icon" to remove.
 Click "Yes" to save and add another provider if desired.
 Select "Amount" as the Type, "0.1" as the value and "Day" as the interval. This is saying that we will sponsor up to 0.1 ETH total per day
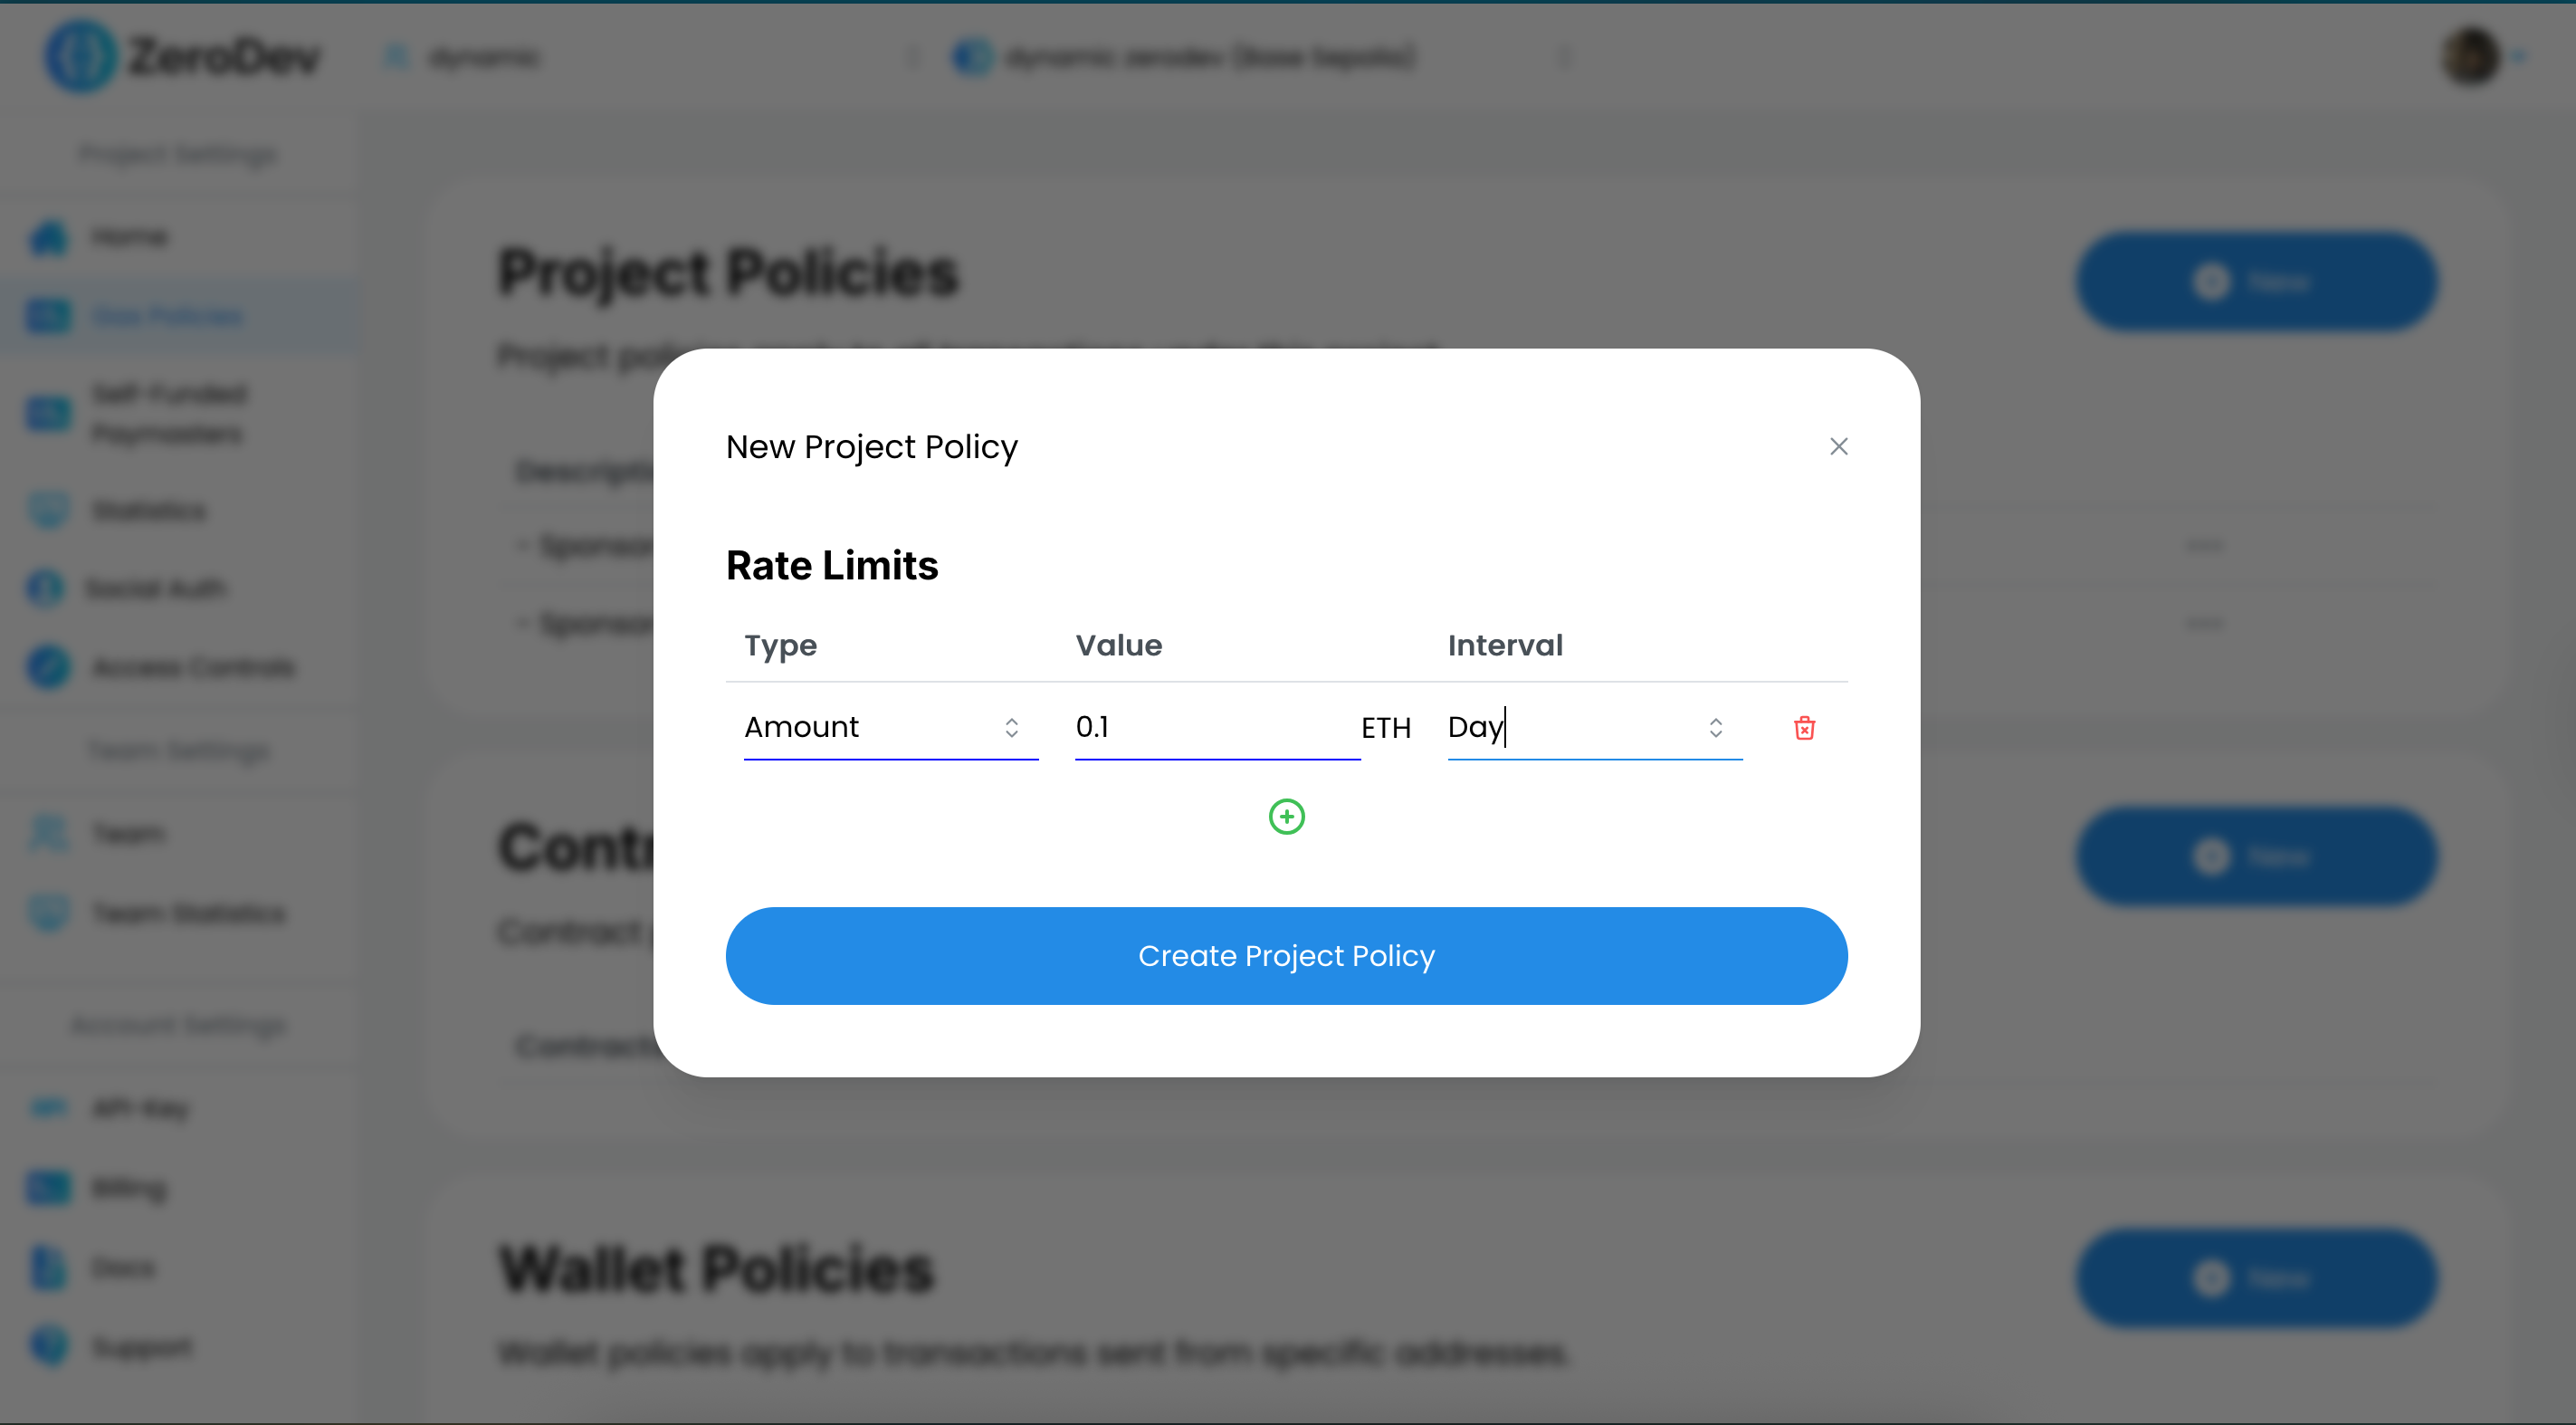 Click Create Project Policy, and that's it! Now start your app, log in and try sending some ETH out. The Dynamic SDK will check if a transaction meets your gas policies and will automatically hide the gas in the transaction confirmation step if the gas is sponsored, if not the gas will be displayed.
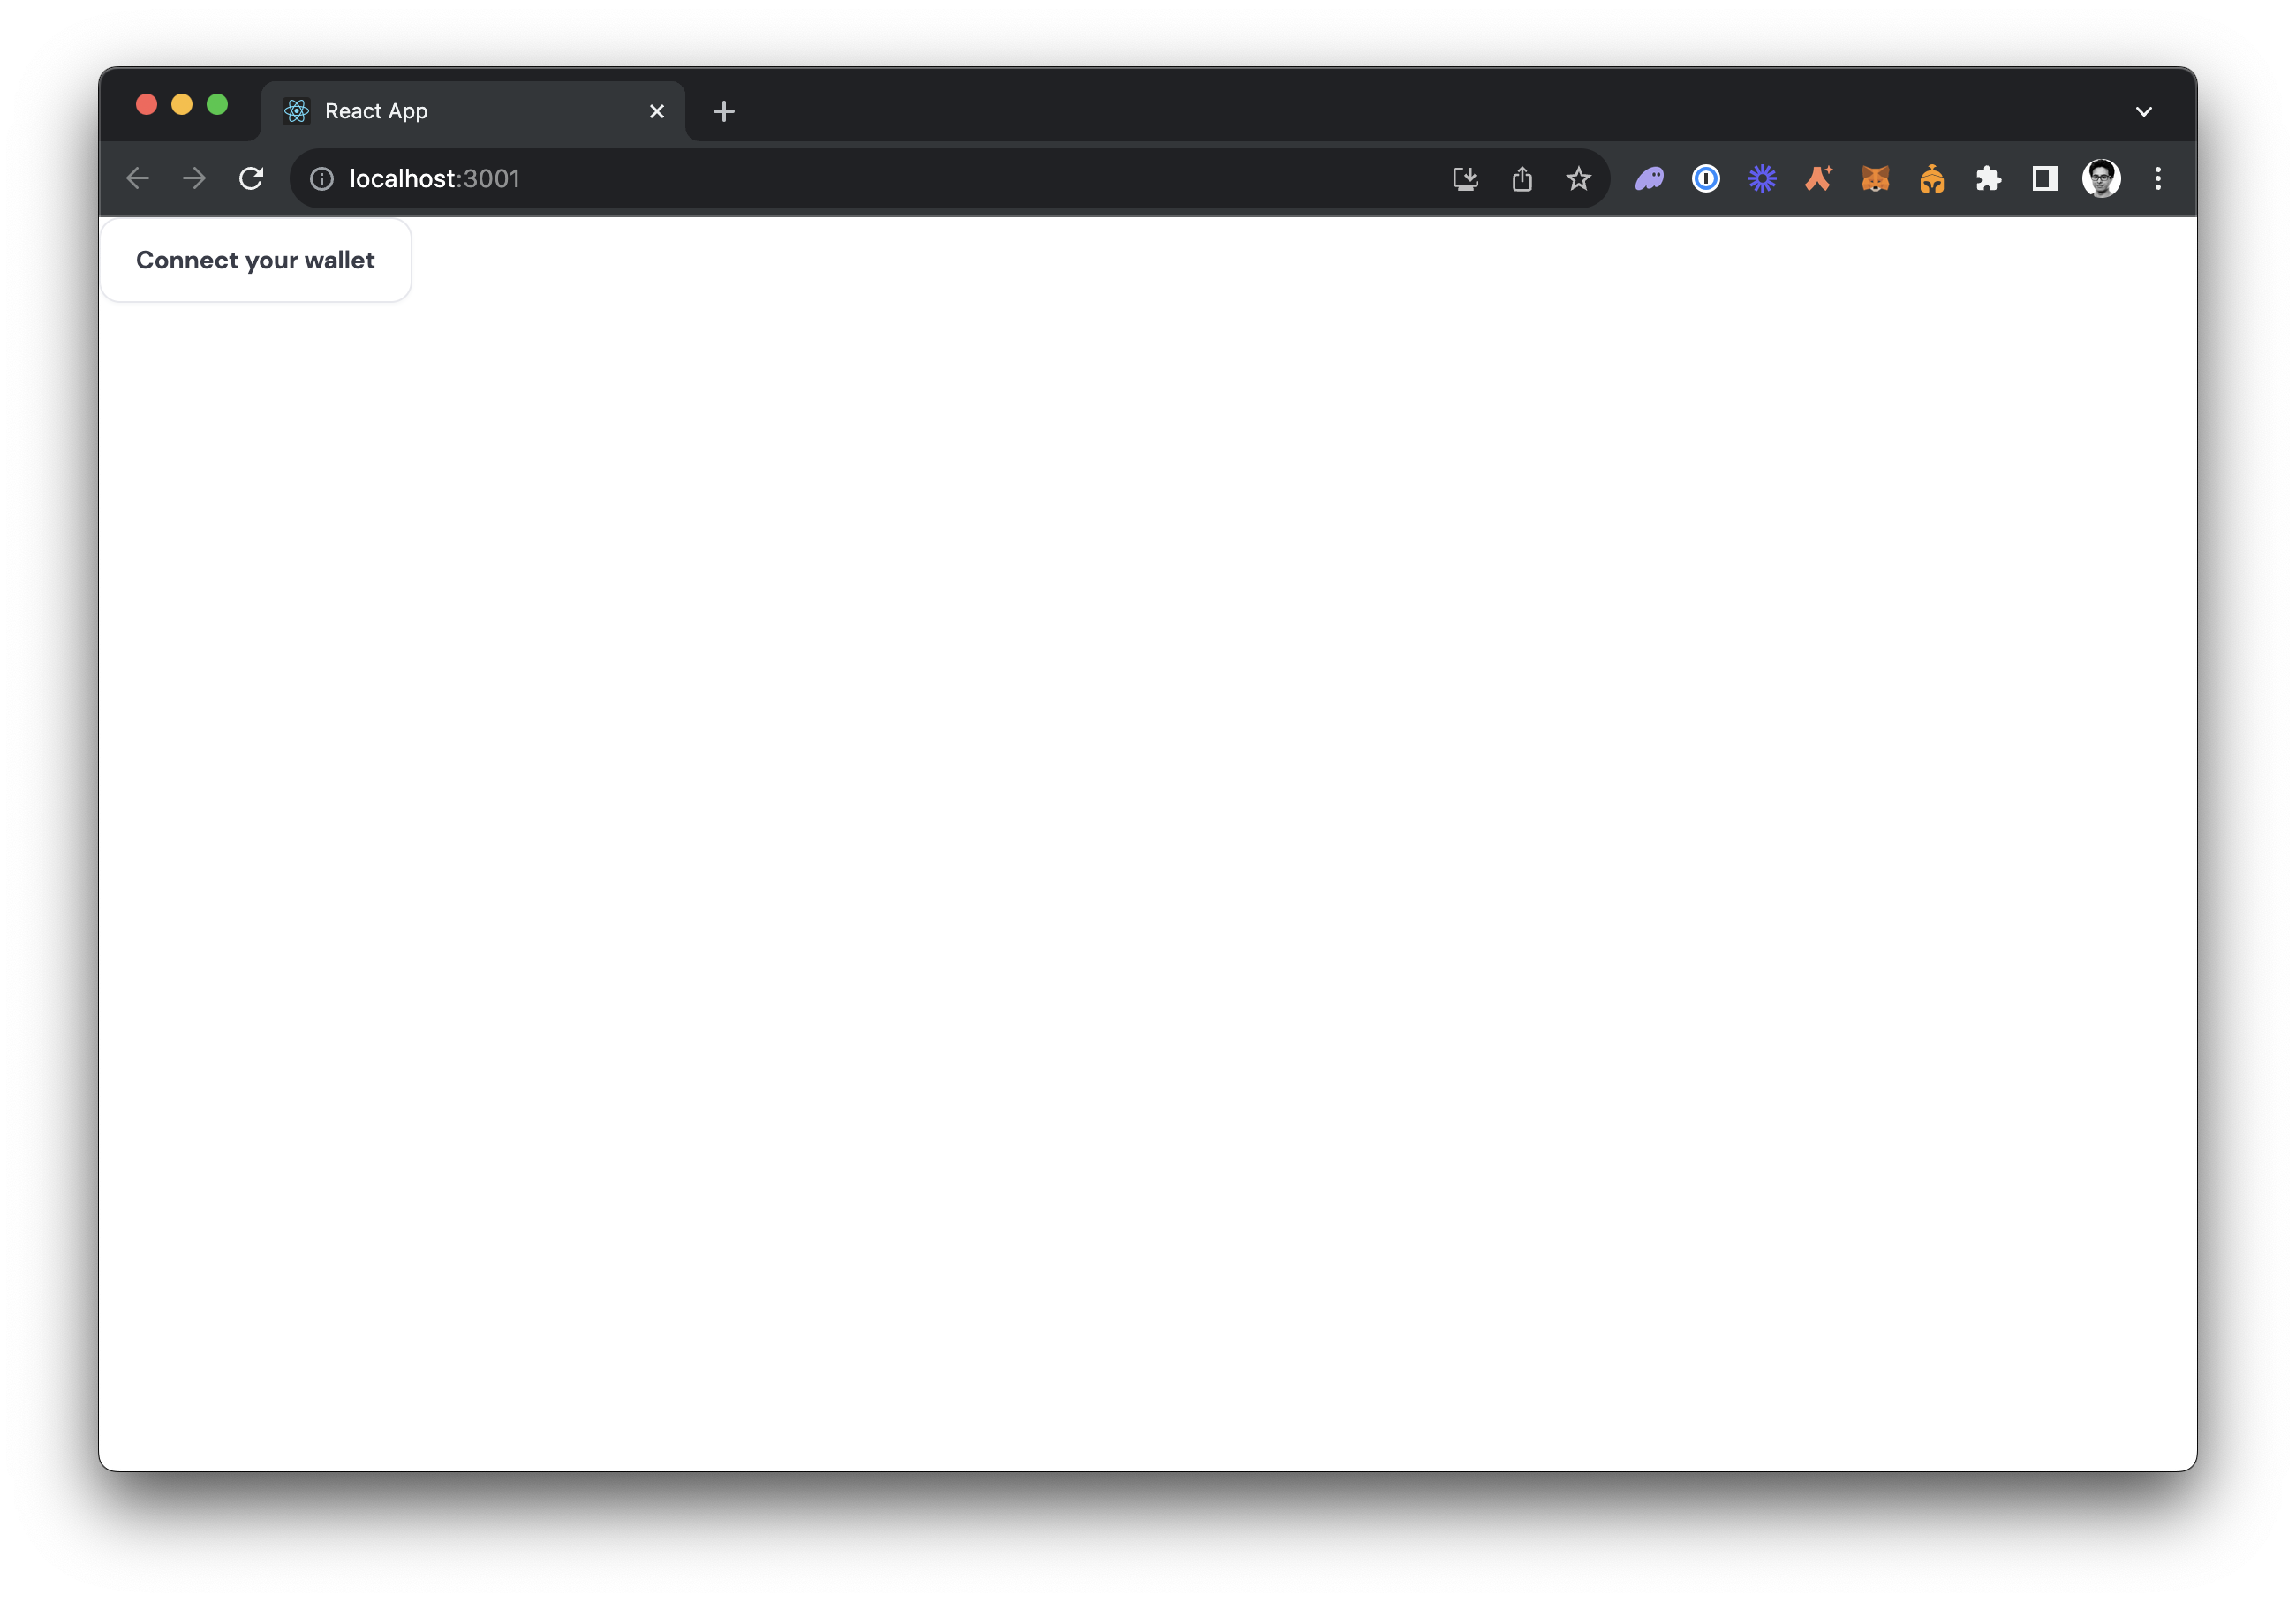 Click Connect your wallet, enter your email and hit Continue. After pasting in your OTP you'll be fully logged in!
Next, we're going to send a transaction. To do that, we will need some of the network's native token. Grab your wallet address by clicking on the Dynamic Widget, then click on the three dots next to your address and hit "Copy wallet address". If you're using Base Sepolia as in this guide, you can paste your address into the [Base Sepolia Faucet](https://www.alchemy.com/faucets/base-sepolia) which will deposit some free ETH into your account. After doing so, if you refresh your app, you should see your balance update
Click Connect your wallet, enter your email and hit Continue. After pasting in your OTP you'll be fully logged in!
Next, we're going to send a transaction. To do that, we will need some of the network's native token. Grab your wallet address by clicking on the Dynamic Widget, then click on the three dots next to your address and hit "Copy wallet address". If you're using Base Sepolia as in this guide, you can paste your address into the [Base Sepolia Faucet](https://www.alchemy.com/faucets/base-sepolia) which will deposit some free ETH into your account. After doing so, if you refresh your app, you should see your balance update
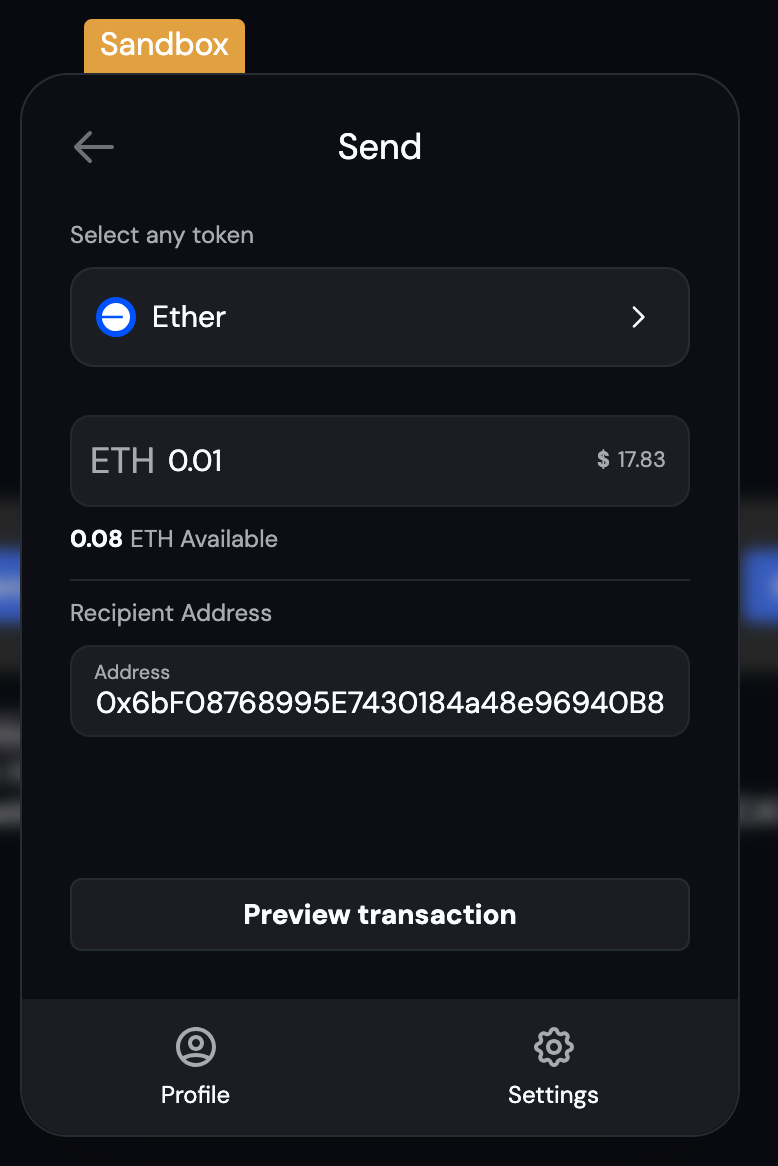 Now, send yourself some tokens by clicking on the Send button in the Dynamic Widget. Enter 0.01 as the amount, and an address of your choosing as the recipient, then hit Send now. You will see a screen like the following. Notice that there is no gas estimate field, because this transaction will be sponsored!
 Hit confirm, sign for the transaction with your passkey. Congratulations, you just sent a gas-sponsored transaction! If you take your smart wallet address and paste it into the block explorer for your network (for Base Sepolia, that's the [Base Sepolia Scan](https://sepolia.basescan.org/)), you will see your smart wallet and the transaction you just sent.
 ## Examples
### Get smart wallet address vs signer address
The wallet connector will return your smart wallet address, that address will be used in the Dynamic UI and is the main address you will interact with. But you can fetch the signer address by using the wallet connector's eoaConnector property and then fetching the address there.
```tsx
import { useEffect, useState } from "react";
import {
useDynamicContext,
DynamicContextProvider,
DynamicWidget,
} from "@dynamic-labs/sdk-react-core";
import {
isZeroDevConnector,
ZeroDevSmartWalletConnectors,
} from "@dynamic-labs/ethereum-aa";
import { EthereumWalletConnectors } from "@dynamic-labs/ethereum";
const SignerAddress = () => {
const { primaryWallet } = useDynamicContext();
const [signerAddress, setSignerAddress] = useState("");
useEffect(() => {
if (!primaryWallet) {
return;
}
const {
connector,
address, // This is your smart wallet address
} = primaryWallet;
if (!isZeroDevConnector(connector)) {
return;
}
const signerConnector = connector.eoaConnector;
if (!signerConnector) {
return;
}
const getAddress = async () => {
const address = await signerConnector.getAddress();
if (!address) {
return;
}
setSignerAddress(address);
};
getAddress();
}, [primaryWallet]);
return
## Examples
### Get smart wallet address vs signer address
The wallet connector will return your smart wallet address, that address will be used in the Dynamic UI and is the main address you will interact with. But you can fetch the signer address by using the wallet connector's eoaConnector property and then fetching the address there.
```tsx
import { useEffect, useState } from "react";
import {
useDynamicContext,
DynamicContextProvider,
DynamicWidget,
} from "@dynamic-labs/sdk-react-core";
import {
isZeroDevConnector,
ZeroDevSmartWalletConnectors,
} from "@dynamic-labs/ethereum-aa";
import { EthereumWalletConnectors } from "@dynamic-labs/ethereum";
const SignerAddress = () => {
const { primaryWallet } = useDynamicContext();
const [signerAddress, setSignerAddress] = useState("");
useEffect(() => {
if (!primaryWallet) {
return;
}
const {
connector,
address, // This is your smart wallet address
} = primaryWallet;
if (!isZeroDevConnector(connector)) {
return;
}
const signerConnector = connector.eoaConnector;
if (!signerConnector) {
return;
}
const getAddress = async () => {
const address = await signerConnector.getAddress();
if (!address) {
return;
}
setSignerAddress(address);
};
getAddress();
}, [primaryWallet]);
return